Table of Contents
- Introduction
- Java-Application
- Python TCP Server on Raspberry Pi
- Result: Stream video from Raspberry Pi to Java-Application
Java-Application
Install Open CV 3.4.2 under Windows (from here)
First of all, you should download the OpenCV library (version 3.4.2) from here. Once you get the folder opencv put in wherever you prefer. Now the only two things you will need are:
- the
opencv-342.jarfile located at\opencv\build\javaand - the dll library located at
\opencv\build\java\x64(for 64-bit systems) or\opencv\build\java\x86(for 32-bit systems).
Set up OpenCV for Java in Eclipse (from here)
- Open Eclipse and select a workspace of your choice.
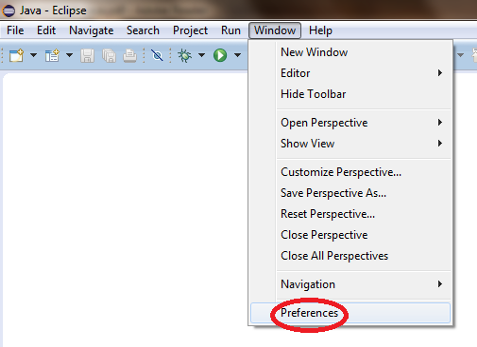
- Create a User Library, ready to be used on all the next projects: go to
Window > Preferences....
- From the menu navigate under
Java > Build Path > User Librariesand chooseNew.... - Enter a name for the library (e.g., opencv342) and select the newly created user library.
- Choose
Add External JARs..., browse to selectopencv342.jar. - After adding the jar, extend it and select
Native library locationand pressEdit....
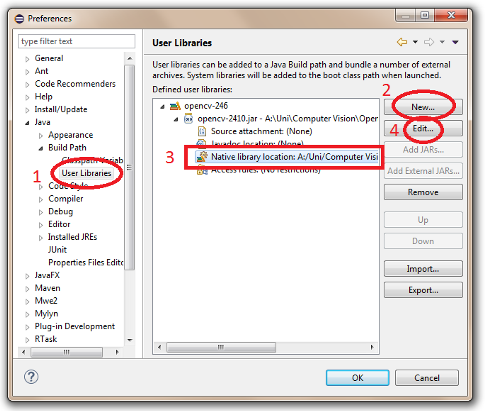
- Select
External Folder...and browse to select the folder containing the OpenCV libraries (e.g.,C:\opencv\build\java\x64under Windows).
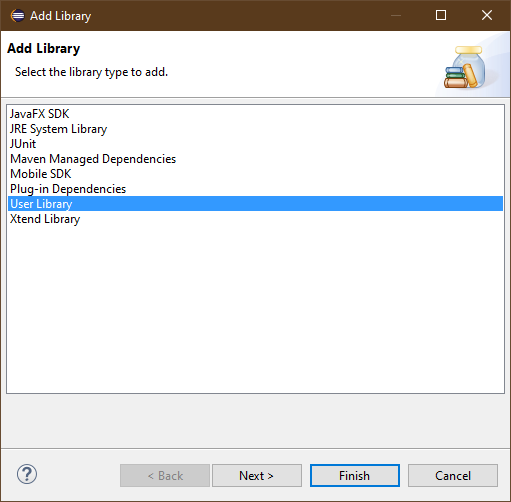
Add Library to JavaFX project
- Do a right-click on your project and choose
Build Path > Add Libraries... - Select
User Library
- After clicking on
Nextselectopencvand pressFinish.
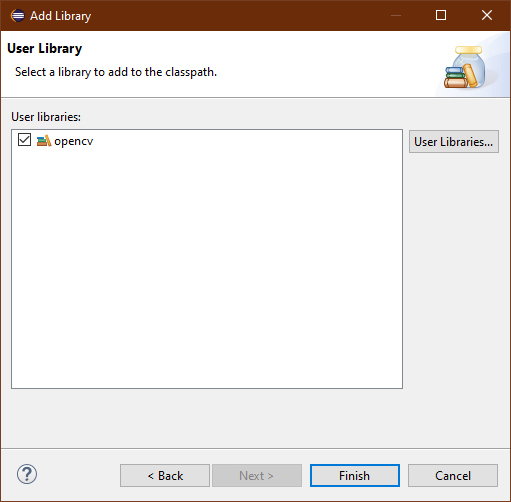
Now we are ready to write our application.
Main.java
This file contains the main part of the application. Firstly, we will define our GUI design of the application in the method start(). We will place a ImageView to show the video frame and one Button to start and stop the streaming.
public class Main extends Application {

	// GUI elements
	private ImageView imageView;
	private Button btnStart;

	@Override
	public void start(Stage primaryStage) {
		try {
			BorderPane root = new BorderPane();

			Image image = getBlankImage(320, 240);
			imageView = new ImageView(image);
			imageView.setFitHeight(240);
			imageView.setFitWidth(320);
			root.setTop(imageView);

			btnStart = new Button("Start Camera");
			btnStart.setPrefWidth(100);
			btnStart.setPrefHeight(30);
			btnStart.setOnAction(e -> {
				handleButtonPress();
			});
			root.setBottom(btnStart);

			Scene scene = new Scene(root);
			primaryStage.setTitle("Video Monitor");
			primaryStage.setScene(scene);
			primaryStage.show();
		} catch (Exception e) {
			e.printStackTrace();
		}
	}
}
The next step is to implement the method handleButtonPress() which will be executed when the button is pressed. Here we want to start or stop the connection to the camera. Therefore we open a TCP connection and start a separate thread for continuous frame grabbing. Otherwise, we will close the connection via the method stopAcquisition().
protected void handleButtonPress() {

	if (!this.cameraActive) {

		try {
			if (clientSocket == null || clientSocket.isClosed()) {
				clientSocket = new Socket("192.168.0.116", 5001);
				outToServer = new OutputStreamWriter(clientSocket.getOutputStream());
				inFromServer = new InputStreamReader(clientSocket.getInputStream());
			}

			// grab a frame every 33 ms (30 frames/sec)
			CameraRunnable frameGrabber = new CameraRunnable();
			this.timer = Executors.newSingleThreadScheduledExecutor();
			this.timer.scheduleAtFixedRate(frameGrabber, 0, 33, TimeUnit.MILLISECONDS);

			// update the button content
			this.btnStart.setText("Stop Camera");
			this.cameraActive = true;
		} catch (IOException e) {
			e.printStackTrace();
		}
	} else {
		// the camera is not active at this point
		this.cameraActive = false;

		// update again the button content
		this.btnStart.setText("Start Camera");

		// stop the timer
		this.stopAcquisition();

		System.out.println("Close Socket...");
		try {
			while (!timer.isShutdown()) {
				clientSocket.shutdownOutput();
				clientSocket.close();
			}

		} catch (IOException e) {
			e.printStackTrace();
		}

	}
}
We create a separated class CameraRunnable inside the class Main implementing the interface Runnable which will actually grab a new frame from the TCP server running on the Raspberry Pi. The interface Runnable provides a function run() which will be executed in our case every 33ms. Inside this function, we send the command “getNewFrame” to the TCP server and wait until the server sends the data back. After receiving the data we can convert the data which is encoded as String back to a BufferedImage or JavaFX Image which can be displayed afterward inside the ImageView.
private class CameraRunnable implements Runnable {

	@Override
	public void run() {
		String message = "getNewFrame";
		try {
			if (cameraActive) {
				long startTime = System.currentTimeMillis();
				outToServer.write(message);
				outToServer.flush();
				char[] sizeAr = new char[16];
				inFromServer.read(sizeAr);
				int size = Integer.valueOf(new String(sizeAr).trim());
				// System.out.println(size);
				char[] data = new char[size];
				int pos = 0;
				do {
					int read = inFromServer.read(data, pos, size - pos);
					// check for end of file or error
					if (read == -1) {
						break;
					} else {
						pos += read;
					}
				} while (pos < size);
				long timeToGrab = System.currentTimeMillis() - startTime;
				System.out.println(timeToGrab);
				String encoded = new String(data);
				byte[] decoded = Base64.getDecoder().decode(encoded);

				BufferedImage image = ImageIO.read(new ByteArrayInputStream(decoded));

				// convert and show the frame
				Image imageToShow = SwingFXUtils.toFXImage(image, null);
				updateImageView(imageView, imageToShow);
			}
		} catch (IOException e) {
			e.printStackTrace();
		}
	}
}
The last important part is the function stopAcquisition() stopping the frameGrabber thread. It checks first if the thread is running and if so stops it.
private void stopAcquisition()

{
	if (this.timer != null && !this.timer.isShutdown()) {
		try {
			// stop the timer
			this.timer.shutdown();
			this.timer.awaitTermination(33, TimeUnit.MILLISECONDS);
		}

		catch (InterruptedException e) {
			// log any exception
			e.printStackTrace();
		}
	}
}
You can find the complete Main.java file here.
Utils.java
This file needs to be imported in the Main.java file. It provides general-purpose methods for handling OpenCV-JavaFX data conversion and was created by Luigi De Russis and Maximilian Zuleger.
public final class Utils {
	/**
	 * Convert a Mat object (OpenCV) in the corresponding Image for JavaFX
	 *
	 * @param frame the {@link Mat} representing the current frame
	 * @return the {@link Image} to show
	 */
	public static Image mat2Image(Mat frame) {
		try {
			return SwingFXUtils.toFXImage(matToBufferedImage(frame), null);
		} catch (Exception e) {
			System.err.println("Cannot convert the Mat obejct: " + e);
			return null;
		}
	}

	/**
	 * Generic method for putting element running on a non-JavaFX thread on the
	 * JavaFX thread, to properly update the UI
	 *
	 * @param property a {@link ObjectProperty}
	 * @param value    the value to set for the given {@link ObjectProperty}
	 */
	public static <T> void onFXThread(final ObjectProperty<T> property, final T value) {
		Platform.runLater(() -> {
			property.set(value);
		});
	}

	/**
	 * Support for the {@link mat2image()} method
	 *
	 * @param original the {@link Mat} object in BGR or grayscale
	 * @return the corresponding {@link BufferedImage}
	 */
	private static BufferedImage matToBufferedImage(Mat original) {
		// init
		BufferedImage image = null;
		int width = original.width(), height = original.height(), channels = original.channels();
		byte[] sourcePixels = new byte[width * height * channels];
		original.get(0, 0, sourcePixels);

		if (original.channels() > 1) {
			image = new BufferedImage(width, height, BufferedImage.TYPE_3BYTE_BGR);
		} else {
			image = new BufferedImage(width, height, BufferedImage.TYPE_BYTE_GRAY);
		}
		final byte[] targetPixels = ((DataBufferByte) image.getRaster().getDataBuffer()).getData();
		System.arraycopy(sourcePixels, 0, targetPixels, 0, sourcePixels.length);

		return image;
	}
}
I published the complete JavaFX Project on my GitHub repository so that you can clone from there.

0 Comments