Design your own lamp? Not easier than that. Here is a step-by-step instruction on how I build my own DIY lamp from wood.

For the DIY lampshade shown, we only need three materials:
- Wooden board 25x25cm – 18mm thick
- wooden stick 5x10mm – 20cm long
- some wood glue
Step-by-step instructions
Seven steps toward the finished lamp:
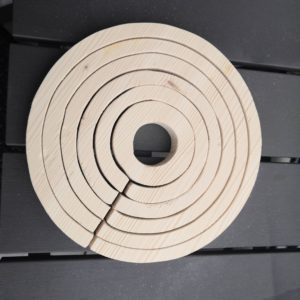
- Drawing the rings
Draw rings with the following radii on the board with a compass: 21mm, 40mm, 55mm, 70mm, 85mm, 100mm, 115mm.
- Drawing the slit
Draw a 5mm wide slit from the centre of the rings to the edge.
- Cutting
First cut the slit to the centre with a saw and then cut the rings one by one. The middle part is not needed.
- Sanding
Deburr the individual parts with the help of sandpaper.
- Stacking and Clueing
The most difficult part is now to stack the individual rings on top of each other with some distance (for example using books as spacers). After that, the rings can be glued to the wooden stick using wood glue. Allow drying for a long time.
- Mounting
Clean the ends of the wooden stick and mount it to the lamp holder.
- Finish
The DIY lampshade fits for standard lamp holder E27 with a screw cap (available in any hardware store).
Have fun making it yourself!
0 Comments