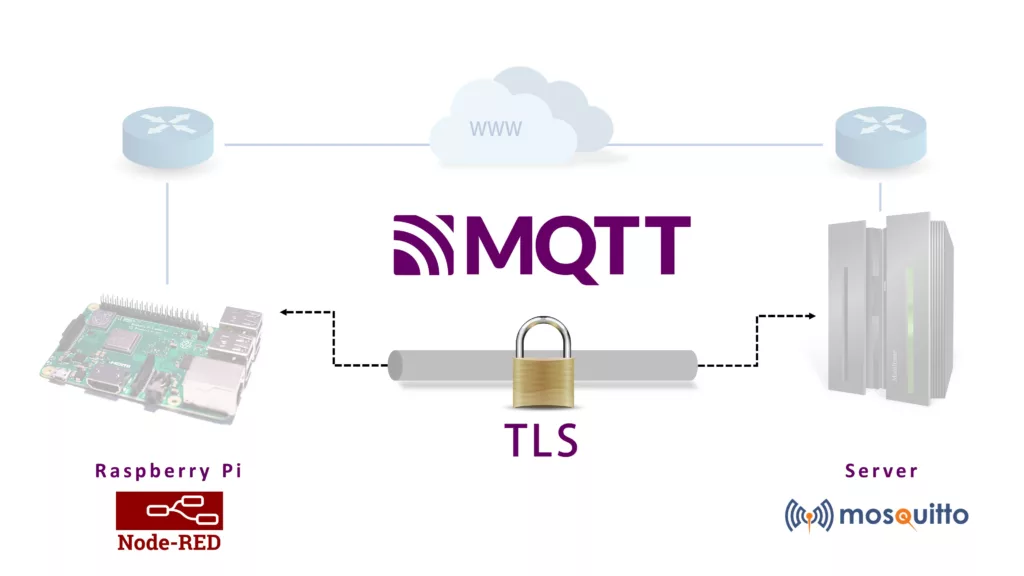
This post is a complete guide on how to set up secure communication from a local Node-RED server to a server on the public internet using TLS-encrypted MQTT messages. In my concrete case, I have a Raspberry Pi running Node-RED to collect data from multiple sensors in my local network. Check out for instance this post, where I described how I access data of a Siemens LOGO PLC via Node-RED. I want to send some status codes regularly to a publicly available server (vServer) running some logging scripts.
In my research for useful tutorials, I did not find a tutorial explaining every part of this process including the generation of the TLS certificates. Therefore I want to summarize the information I found in this article. Please find my references at the end of this post.
This post has the following structure:
- Install MQTT Broker on a remote server
- Generate Secure Self-Signed Server and Client Certificates with OpenSSL
- Configure MQTT Broker to use the generated certificates [on server]
- Configure Node-RED to use the generated certificates [on Raspberry Pi]
Install MQTT Broker on the remote server
MQTT is an open network protocol for communication between devices that exchange telemetry data. It is based on a publish/subscribe model in which an MQTT broker forwards messages from publishers to subscribers. MQTT is particularly suitable for applications in the Internet of Things because it requires low bandwidth and resources and offers high reliability and security.
There’s a large collection of MQTT brokers available that can run from a remote server, or locally. In this post, I am running a free and open-source broker called Mosquitto on my remote server.
Installation
The MQTT broker Mosquitto is available in the Debian package sources and very comfortable to install on Ubuntu. You just have to enter the following command in the terminal.
sudo apt install mosquittoTo test directly on the server, you can still get the mosquitto_sub and mosquitto_pub commands by installing the following.
sudo apt install mosquitto-clients
Start and stop MQTT broker
The Mosquitto server is automatically started with the installation and registered as a systemd service so that it automatically starts again on reboot. You can use the following commands to start, stop, restart, and disable or enable auto start.
sudo systemctl start mosquitto
sudo systemctl stop mosquitto
sudo systemctl restart mosquitto
sudo systemctl disable mosquitto
sudo systemctl enable mosquitto
Test MQTT Broker
Make sure the MQTT broker is running.
sudo systemctl status mosquittoStart the command line subscriber on the topic test/topic:
mosquitto_sub -v -t 'test/topic'Publish a test message with the command line publisher on a separate terminal. It should appear in the terminal where you ran the subscriber.
mosquitto_pub -t 'test/topic' -m 'helloWorld'
MQTT Logs
The logs for the MQTT broker are stored in /var/log/mosquitto/mosquitto.log. This can be useful to check if something is going wrong.
Generate Secure Self-Signed Server and Client Certificates with OpenSSL
In this chapter, I will describe how to create the needed certificates for the server and client. The instructions are taken from this blog post: Devolutions Blog.
Step 1 – Certificate Authority
Step 1.1 – Generate the Certificate Authority (CA) Private Key
Every certificate must have a corresponding private key. Generate this using the following command line:
openssl ecparam -name prime256v1 -genkey -noout -out ca.keyThis will create a 256-bit private key over an elliptic curve, which is the industry standard. We know that Curve25519 is considered safer than this NIST P-256 curve but it is only standardized in TLS 1.3 which is not yet widely supported.
Step 1.2 – Generate the Certificate Authority Certificate
The CA generates and issues certificates. Here is a link to additional resources if you wish to learn more about this. Generate the Root CA certificate using the following command line:
openssl req -new -x509 -sha256 -days 365 -key ca.key -out ca.crtYou will be prompted to provide some information about the CA. You are about to be asked to enter information that will be incorporated into your certificate request. There are quite a few fields but you can leave some blank.
Your CA will be created once you enter your information.
Step 2: Server Certificate
This step may be repeated for each server you need. In our case, we need to run it only once.
Step 2.1 – Generate the Server Certificate Private Key
To generate the server private key, use the following command line:
openssl ecparam -name prime256v1 -genkey -noout -out server_mqtt.keyThis will create the file name server_mqtt.key.
Step 2.2 – Generate the Server Certificate Signing Request
To generate the server certificate signing request, use the following command line:
openssl req -new -sha256 -key server_mqtt.key -out server_mqtt.csrFor maximum security, it is strongly recommended that the signing request should only be generated on the server where the certificate will be installed. The server’s private key should never leave the server!
You will be prompted to provide some information about the server certificate. You can enter the same information you used for the CA certificate.
In addition, you will be prompted to create a password. Make sure to use a long, strong, and unique password.
Step 2.3 – Generate the Server Certificate
You are now ready to generate the server certificate, which can be done through the following command line:
openssl x509 -req -in server_mqtt.csr -CA ca.crt -CAkey ca.key -CAcreateserial -out server.crt -days 1000 -sha256This step should only be performed on the Certificate Authority server as the CA private key should never leave the host where it has been generated. You must transfer the signing request (server_mqtt.csr) to the CA server.
Step 3: Client Certificate
This step may be repeated for each client you need. In our case, we have only one client: the Node-RED instance running on the Raspberry Pi.
Step 3.1 – Generate the Client Certificate Private Key
Use the following command line to create the client certificate private key. Run the command on the client (e.g. on Raspberry Pi in a custom folder ~/mqtt_client/certs where you want to save the certificates).
openssl ecparam -name prime256v1 -genkey -noout -out client_mqtt.keyThis will create a file named client_mqtt.key.
Step 3.2 – Create the Client Certificate Signing Request
You need to create a signing request to generate a certificate with the CA. Use the following command line:
openssl req -new -sha256 -key client_mqtt.key -out client_mqtt.csrFor maximum security, it is strongly recommended that the certificate signing request should only be generated on the client where the certificate will be installed. The client’s private key should never leave the client!
Next, you will be prompted to submit information about the client certificate. You can enter the same information as the CA certificate, except for the last two entries: Common Name and Email Address. These should be the name and email of an individual and not your company.
You will also be asked to set a password on the certificate signing request. Once again, make sure that you choose a strong and safe password.
Step 3.3 – Generate the Client Certificate
You are now ready to generate the client certificate, which can be done through the following command line:
openssl x509 -req -in client_mqtt.csr -CA ca.crt -CAkey ca.key -CAcreateserial -out client1.crt -days 1000 -sha256This step should only be performed on the Certificate Authority server as the CA private key should never leave the host where it has been generated. You must transfer the signing request (client_mqtt.csr) to the CA server.
It is recommended to generate a single certificate for each client, as this lets you quickly identify the affected client in the event if an issue or problem. For maximum security, the client private key should remain on the client and never be copied on another host.
Step 4: Prepare the certificate and key files for Node-RED
Node-RED needs to have the OpenSSL certificates and keys as .pem-file. So you need to convert the .crt and .key files from the previous section to .pem files.
Step 4.1 – Convert a .crt file to .pem
Run the following command to convert the certificate files:
openssl x509 -in ca.crt -out ca_cert.pem -outform PEM

openssl x509 -in client_mqtt.crt -out client_mqtt_cert.pem -outform PEM
Step 4.2 – Convert a .key file to .pem
Run the following command to convert the .key file to .pem:
cp client_mqtt.key client_mqtt_key.pem
Renew the certificates
In the case that the CA certificate or one of the other certificates did expire you can renew them in the following way.
CA certificate
Enter the folder where you saved the CA certificate (ca.crt) and run the following two commands to renew the CA certificate for additional 365 days. Afterward, you need to restart the MQTT broker and copy the CA certificate to the clients as well (e.g. to Raspberry Pi where Node-RED is running).
openssl x509 -x509toreq -in ca.crt -signkey ca.key -out new-ca.csr

openssl x509 -req -days 365 -in new-ca.csr -signkey ca.key -out ca.crt
Client and Server
For server and client certificates, you can just run the command for generating the certificates again (Step 2.3 for the server and Step 3.3 for the client).
Configure MQTT Broker to use the generated certificates [on server]
Now that all certificates are created, you have to tell Mosquitto to use TLS and where the certificates are located. To do this, open a new config file in /etc/mosquitto/conf.d/ in a text editor,
sudo nano /etc/mosquitto/conf.d/TLSconfig.conf and insert the following content (replace the path for .key and .crt files accordingly)
# Local MQTT
listener 1883

# Secure MQTT
listener 8883
## This is standard and should always be this
cafile   /home/<username>/mqtt/certs/ca.crt
## These are from your installation of LE
certfile /home/<username>/mqtt/certs/server_mqtt.crt
keyfile  /home/<username>/mqtt/certs/server_mqtt.key
## Forces use of modern version of TLS to avoid security issues
tls_version tlsv1.2
## Force all clients in this listener to provide a valid certificate
require_certificate true
## Stop all unauthorised connections
#allow_anonymous false
## Use password file
#password_file /etc/mosquitto/passwordfile
This configuration defines in the first line that we want to have no TLS encryption in the local network. So clients in the local network or on the remote server itself do not require to use a TLS-encrypted connection and need to connect via port 1883. This port should not open for external communication on the server.
The remaining lines tell Mosquitto to listen to port 8883 and use TLS to handshake with the client there.
certfile and keyfile specify the paths to the server certificates that Mosquitto uses to authenticate itself.
cafile is the CA’s public certificate, which ensures that the certificates (server and client) have been signed by the CA.
require_certificate forces clients to identify themselves by certificate. If there are good reasons why your clients don’t need or can’t use certificates, this can be set to false. However, this reduces security.
Last but not least Mosquitto needs to reload the config once. I usually do this with
sudo systemctl restart mosquittoWith this command, Mosquitto restarts and has about 5-10 seconds of downtime.
We need to open port 8883 on the remote server firewall. If you are using ufw this can be done with the following command:
sudo ufw allow 8883Additional information on how to create users with different permissions within Mosquitto can be found in this fantastic blog post.
Configure Node-RED to use the generated certificates [on Raspberry Pi]
I assume that you have successfully installed Node-RED on the Raspberry Pi.
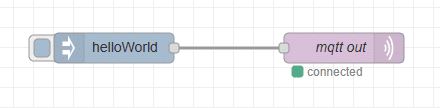
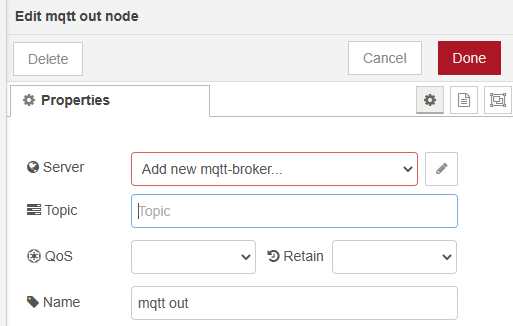
The first step is to place an mqtt out node in your flow. I also added a inject node to inject a string to be sent to the MQTT broker.
The next step is to create a new MQTT broker configuration in Node-RED. In the properties of the mqtt node click on the pen next to the server dropdown field.
On the page that is now visible, add the IP address of your remote server in the field Server and activate the Enable secure connection checkbox. Now you have to create a new TLS-config. Click on the pencil next to the dropdown TLS Configuration.
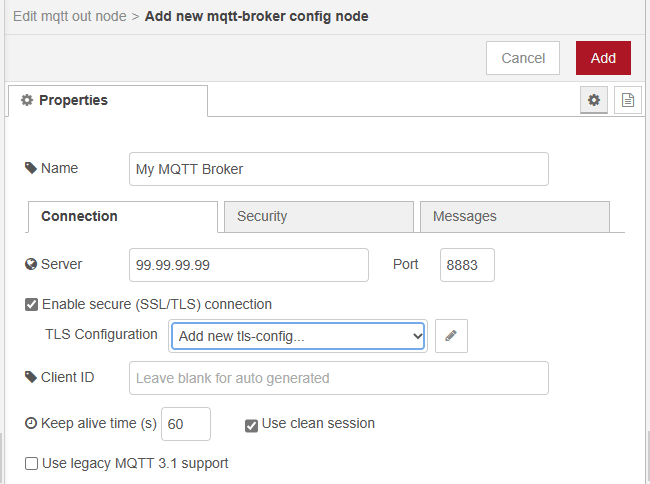
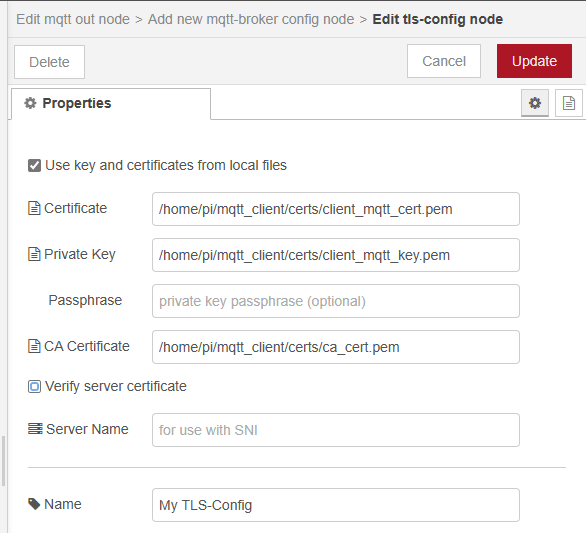
In the TLS configuration activate the checkbox Use key and certificates from local files and enter the absolute paths to the client certificate, key, and ca certificate. Uncheck the checkbox Verify server certificate.
That is all the configuration that you need to do in the MQTT node, apart from setting the topic, QoS & Retain options. It should now connect to the broker.
Test the connection
The following short Python script listens on the topic test/topic and writes any message to a file name log.txt. You can run this script on the remote server so that it can directly connect to the MQTT broker without TLS.
import paho.mqtt.client as mqtt
import time

# The callback for when the client receives a CONNACK response from the server.
def on_connect(client, userdata, flags, rc):
    print("Connected with result code "+str(rc))

    # Subscribing in on_connect() means that if we lose the connection and
    # reconnect then subscriptions will be renewed.
    client.subscribe("test/topic")

# The callback for when a PUBLISH message is received from the server.
def on_message(client, userdata, msg):
    timestamp = time.ctime(time.time())
    print(timestamp + " - " + str(msg.topic) + ": " + str(msg.payload))

    f = open("log.txt", "a")
    f.write(timestamp + " - " + str(msg.topic) + ": " + str(msg.payload) + "\n")
    f.close()


client = mqtt.Client()
client.on_connect = on_connect
client.on_message = on_message

client.connect("localhost", 1883, 60)

# Blocking call that processes network traffic, dispatches callbacks and
# handles reconnecting.
client.loop_forever()
Run the script with
python3 MQTT_log_server.pyIf you trigger the inject node the message “helloWorld” should appear in the file log.txt.
References
- MQTT auf dem Raspberry Pi – Mosquitto Part I (plantprogrammer.de)
- MQTT-Kommunikation, aber sicher: TLS und Berechtigungen – Mosquitto Part II (plantprogrammer.de)
- MQTT – TLS encryption example – Share Your Projects – Node-RED Forum (nodered.org)
- Introduction to MQTT – SparkFun Learn
- TUTORIAL: How to Generate Secure Self-Signed Server and Client Certificates with OpenSSL – The Devolutions Blog
- How to renew expired root CA certificate with openssl | GoLinuxCloud


0 Comments